Pages

Friday, April 20, 2012

Depth of Field (DOF)

Alright, so it's been a very long time, but I've finally researched it and I will now explain depth of field.
What it means is the distance between the furthest and nearest object. Your camera can really only focus on one thing at a time and the unsharpness decreases gradually on either side of the object in focus.
Depending on the picture you aiming for, you may want the entire picture to be entirely sharp or only a certain object or area to be focused, making the background and foreground extremely blurry.
Again, this picture is from Wiki, not mine, but it explains visually what I just wrote up there. As you can see, everything before and after the middle butterfly is blurry, while the middle one is sharp.
The photo below shows again what I explained.

This picture is taken at f/32 and the flower isn't the main point of concentration.

While this pictture is taken at f/5.6 and the flower is the main attraction.

Thanks for reading, any questions, email or just reply.

Friday, March 9, 2012

Tripod

Okay, so I've got another short story for those of you that might stumble upon this blog.
You're definitely not in the wilderness this time, you're in the city for a while still trying to perfect your photography and hopefully get some sweet shots.
So there you are on the street, watching all the cars pass at night, mezmorized by the lights. You want to capture the trail that they leave behind them with a longer exposure (let's say 30 seconds) but every time you've tried you can't hold the camera long enough without getting a blurry picture, which can be cool, but that aint what you want. Once again you type in the address of this blog hoping that this chick will having something to solve your problems. Once again, she does. :)
You need a tripod to keep your camera still while you have a long exposure to capture the light trails. This tactic can be useful for not only long exposures, but with family pictures and such. Also, I've been experimenting with starry night pictures and taking pictures of the moon with my new zoom lens (70-300mm). I find that it helped me so much because there was no way that I could hold my camera for so long without getting a blurry picture. Here's my best shot so far (I know it still isn't even all that great, but I'm working on getting a better one).
If you find that your pictures are still too blurry, it's probably because you're clicking the shutter button with your finger and moving the camera the slightest amount in the process. SO, to solve that problem, you might want to look into getting Remote Shutter Release Cable or Wireless Remote Shutter Release. They come in either a remote with a cable or wireless remote and can be very useful if you don't want to move your camera while pressing down the shutter button. With this you can hit a button that will open and close you shutter with you moving or touching your camera at all, which is awesome!


I realized that I should probably tell whoever reads this the prices of everything, so I will go back and do that. I've gotten everything for my camera at Henry's so I will list their prices.
For the tripod: I have Henry's HTV85 video tripod which is $130, but I've seen others that go up to $240 or less that are $80, but you'd have to go into a store and get one for your height and for the durability that you want.
For the Remote or Wireless Remote Shutter Release: I've seen anywhere from $90-150, but Kijiji will most definitely have stuff for cheaper.


Hope this helped, au revoire!

Thursday, January 26, 2012

F-stop-op-op PART 2

Dun, dun, dun!
I'm just showing y'all some pictures I stole from my best friend, Wikipedia, to help better understand aperture in case you didn't get it the first two times I tried explaining it to you. :) The aperture starts at probaly f/32 of f/24 or something, then maybe to f/5.6.


As you can, the hole gets bigger as you follow the sequence of photos, which means more light that is being let in, the clearer your photo will be. In the next post I will explain DOF (depth of field) which has much relation to aperture, but I'm tired right now and I don't want to have to look at this blog for at least another week. Goodnight all.

Wednesday, January 25, 2012

F-stop-op-op PART 1

Aight. Let's get down to business.
F-stops. Aperture.
Let's make this simple.

First off, your aperture is measured in factions, but those fractions are also called f-stops. Aperture is measured in f-stops which is measure in fractions. Say that 10 times in your head, ready, GO!

Next, if your camera, for example, is set to f/2, that means 1/2, which also means that the hole that the light travels through is HALF THE SIZE OF THE LENGTH OF YOUR CAMERA LENS. Understand this.
Therefore, if you have f/18, the hole will be extremely small and that the hole is 1/18th the length of your lens. In conclusion, the bigger aperture you have, the sharper your pictures will be (although most soft spots on SLR cameras are in the f/8 - f/11 area), and the smaller aperture the fuzzier life will seem. Here are two pictures to help you understand.

1. This photo was taken with an aperture of 10 and a shutter speed of 10 seconds.


2. This photo was taken with an aperture of 4.5 and a shutter speed of 2.5 seconds.


As you can see from my examples, in the first pictures, the smaller hole was compensated by the shutter speed and came out with a fuzzier picture, while the one with a bigger hole and smaller shutter speed came out with a clearer picture.

And that concludes my aperture diagnostic. Stay tuned.

Thursday, December 1, 2011

Get me some lens

To the very small population of people that actually read this thing, I have another post for y'all!
I promised (I think) that I'd write about lenses and which one would suit you best.

For the record, if you're strating out, kind of like me, you'll just want to be looking at 3 types of lenses. If you just bought your camera and it came with a lens or the people at the store suggested a basic lens for you, they probably gave you a lens with a focal length of 18-70mm. This is a very good length for beginners and I will explain why in a moment.

Focal Length
The focal length of a lens simply means the distance between the first glass element and the object in focus. So, if the distance is bigger between the lens and the object, then you will be able to take pictures from farther away because the magnification will be bigger. Choosing the right lens for what kind of pictures you want to take mostly depends on the focal lenght. Yes, there are other factors like aperture which is the f-stops, but without the proper zoom, your ideal photo may be in the ruins.


Zoom, ZOOM!
Okay, so this may sound a little repetative, but let's say you have this fond love for animals, but you can never get close enough to them without scaring them, which sucks because that just ruins everything. So you go stumbling on the internet in a rage for tips on photography and how to get those really sick National Geographic quality close-up photos and you find yourself looking at this blog. You read the headline and you're like, "Wtf? What loser would write a whole blog about photography?" You almost click the back button to keep searching, when this post catches your eye and you think, "Hold on a second..."
So you start reading and you find out that a Zoom  lens is the lens you need to achieve those much sought after photos that you drool over when you flip through your monthly volume of National Geographic. But you're still curious and think, "Okay, this girl might have the information that I need." So you keep reading.
Turns out that your basic crappy lens that you've been trying to take pictures of squirrels with is getting you nowhere (but I'm sure you've already figured that out) and you're wasting time by not going and getting yourself a Zoom lens, which clearly, is what you need.
Now, with that being said, you need to decided how far you want your lens to zoom. Of course there are lenses that go up to 300mm and more, but if you know you're only going to be in the park, or going to the Zoo, then you might not want to carry around a hunking piece of glass and plastic and such, which means maybe only a 200mm or 150mm lens. I mean, maybe if you go to the gym 3 times a day and all you obssese over is your back and neck muscles, yeah that won't be a problem, but your average Joe neck and back may not be all lovey-dovey at the end of the day. So, you must consider how much zoom you want.
For really close-up stuff, like insects, you won't need that much because you will most likely be able to get right up in their crib, but let's say you do go to the Zoo and the polar bears are on the other side of theircage chillin', then you might want a little more to get that cute furry face of theirs.
Either way, when you get this zoom lens, really think about what pictures you want out of it, how close you'll be standing to your object in focus and most importantly, whether or not you want to do your neck and back a favour.

Hey! I can see the whole mountain side!
Okay, next up, the wide angle lens!
So, now you're a backpacker and you have this sick zoom lens that lets you take some cool pictures of caribou roaming Nunavut on one of your crazy 30 days canoe trips (not that I would know about those). It's great 'cause with this new lens you can take pictures of them from far away and not disturb them, so the turn out is great. But then on one of your chill days, you decide that you're going to climb this really intense canyon to see the rapids and such down below. So you get to the top and you try to get a sweet picture of the canyon, the rapids and the river that you just paddled, but your zoom lens is too strong and you can only get half of the picture that you wanted. So the whole experince is ruined and you get back from your trip in a bad mood.
You end up flipping open you computer and madly typing in more information about how to get the picture that you wanted, when you remember this blog and you think, "Hey, I wonder if that girl has a post about this." There you are typing in the blog adress and you scroll down, hoping that whoever wrote this silly post was smart enough to know that there are people out there like you wondering how in the world to get that canyon picture.
Sure enough, there's a post that's right after the one you read a while ago, this post actually, that talks about the wide angle lens. You sigh with relief and settle down for some good reading. Turns out (again) that you haven't been wasting your time with a stupid zoom lens, you've actually been taking some pretty cool pictures that all your friends gap about on Facebook, but you need more than just that zoom lens for you stupidly long canoe trips. You need a wide angle lens that doesn't have large amounts of distance inbetween the first glass element and the object in focus. Yes, you're shooting from across a canyon, but you don't want zoom, you want a lens that can take in a vast area in one shot. This means that your lens with have a focal length from, for example, 18-50mm. Not very big, but that's what you'd need. Now go out and stop wasting your time. Take them canyon pictures!

Ladies and Gents, let's stick to the original
No story this time, it seems my creativity has reached its max. Our last lens is the one that either came with the camera or that the "experts" at the store suggested you get for your first lens. This lens I find is a good balance and a great way to start out. Yeah, you won't be able to take sick canyon shots, or close-ups of that lone caribou, but you will be able to take this lens for a night out and snap some pics of your friends, or even just the odd thing that you see wandering downtown. Yes, all lenses are somewhat heavy, but this lens is average and I find is bearable when lugging it around all day. The focal length on these lenses is going to be around 18-70mm, like I said before. If you have a lens that is around this length are you're starting out, go out for fun and mess around, see what works and what doesn't, then try to make it work.

That just about sums up the lens options. If you do happen to stumble upon this blog, please write and tell me what you think. I'm open to any critiques.
Enjoy,
Get snaping!

Tuesday, November 15, 2011

Letters, eh?

All right, so last post I briefly mentioned the mode dial and the effects and slight benefits of
each mode. In this post, I will go into more detail with the "letter*" modes.
Starting with the "A," which stands for aperture, if you have your camera on
you or are just reading, you can switch your dial to the "A" and if you prefer, switch your focus to either manual (M) or autofocus (AF)*.


To further clarify how to switch your lens from Manual
focus to Autofocus (and vice versa), the picture on the right indicates where the switch is.
Now that you're set up, try to take a picture of something close-up. Go on!
What do you notice?
See how the background of the image isn't quite blurry? Or maybe it's very blurry and all the attention of the lens is focused on what you wanted to take a picture of? Well, let's say that your background was very sharp, but you wanted to soften everything so that there was more emphasis on the object of interest. What you want to do is look into your viewfinder.

Right near the middle of the line of numbers and letters at the bottom that appear in green,
there should be a letter "F" with a number besides it. Depending on what kind of lens you have, your aperture will change. Aperture is expressed as F-stop, e.g. F2.8 or f/2.8. The small
er the F-stop number (or f/value), the larger the lens opening (aperture). This means that with a smaller aperture (smaller opening) less light will come in and you will probably want to be taking pictures in open areas where there is a lot of light, while larger apertures (bigger openings) mean that your camera will take good pictures in low lighting. Therefore, if you are aiming to take a picture of something close-up, but are inside and there isn't much light, are larger aperture (ex. f/4.6) would be recommended. To change this setting, one must rotate the dial located on the front of the camera.

Here is a picture that I took in low lighting with an aperture of 5. Notice the clearness of the glass, while the background is still quite blurry.
If you're still curious about this and feel that I
haven't gone into enough detail about the subject, there is a link that I have posted that talks more about the same thing, hopefully it will help you.

Moving on! Next we have the "P" mode, which stands for Program. This mode I haven't yet
explored (haven't had a need to explore so far). I'm assuming that this mode is used mostly when you know what your subject will be and are not in the mood for setting everything up, so you've pre-programmed everything. If your camera came with a manual, then there should be more information in there, otherwise, I have posted another link about this and everything you need to know.

These last two are my favourite and I find myself using them quite a bit more than any other mode. Starting off with "S" for "Shutter," switch your dial to that. In this mode, as I have mentioned before, it is where you manually select the shutter speed that you feel has the best fit, while the camera automatically sets the aperture. Now, with the shutter speed, you can take many pictures with different lighting and with different effects depending on how you want certain moving objects to turn out.
I like this best for taking pictures in dark lighting and allowing to camera to gather the light, although it probably most commonly known when taking long exposure photos.
When setting this, you want to look for a number in your LCD display near the shutter button (the button that you click to take a picture).

The number in this picture is not a number, actually, but a word. The word "bulb" in this
pictures is the replacing number that usually displays the shutter speed. with a faster shutter speed, less light can enter. Slower shutter speeds allow the lens to collect light.
When the camera is set to "bulb," you fully decide how long you keep the shutter open. With all of these modes and any mode, this can be tricky if you don't have a tripod and are looking to gather a lot of light in one shot.
In this other picture, you can see that the word is replaced by the number 100. This number means that the lens is opening and closing in one one hundredths of a second (1/100), which is considerably fast. (Also notice the aperture of f/5, below).

To change the shutter speed, one must switch a dial located underneath the LCD display. In the picture(below) it is circled as the "Adjustment Dial."


In this next picture, you'll notice that as the shutter speed gets smaller (1/1000 to 8 [eight seconds], the object gets very blurry as it is moving. With a shorter shutter speed on a moving object, the clearer the object will be, while the longer speed with only catch a blurry figure).


And lastly, there is "M" mode, a.k.a. manual mode. In this mode, you can decide what aperture and what shutter speed you want to achieve the photo you seek. I love this mode when I'm fooling around and what to see what I can produce with my camera. I think this is the most likeable mode because it leaves so much room for discovery and creativity. Although, if used falsely, the outcome may be horrendous. Play around with all of these modes, find what works with what lighting, or how long you should hold the button down to get the amount of light you desire.

So that just about summarizes and gives a brief description of the modes and what I learned from reading and trial and error. If there are any questions when you perhaps stumble across this blog, feel welcome to post and ask away.
Goodnight, for now.
*Anything highlighted in this shade of green means that you can find this word or a definition of this word somewhere else on this blog. If you are finding yourself to be confused about what I'm talking about and see that there is a word highlighted in green, I highly suggest going and finding the post where I elaborate on the topic.

Sunday, November 13, 2011

Mode, oh Mode...

Hello!


I said that I was going to go to bed, but I love typing and I really wanted to get this information down. In this post I'm going to really simply inform you of the different modes that are available with my camera. This won't be all that descriptive, just to get you started.
In this picture below, you will see that there are two areas that are separated by a silver lining around four of the modes (the ones that are just letters vs. the ones that just pictures).

I'll start with the letters, starting with the "M" and go clockwise.

The Letters...

The "M" stands for "Manual" mode, which is where everything you do to take your picture is manual (aperture, shutter speed, ISO, ect...).
The "A" stands for "Aperture" where you manually set the aperture, and the shutter speed is automatic.
The "S" is for "Shutter" where you manually set the shutter speed, while the aperture is automatic.
The "P" is for "Program." This you set manually and all the settings are preset.

Then there were the pictures...

"AUTO" is obviously the mode where the camera does everything for you where it sees the best fit. I love this mode especially when I don't want to miss an opportunity and can't figure out what settings I want fast enough.
Then there's "Portrait" (with the lady wearing a hat) for pictures of people, mostly, "Landscape" (with the mountains) for landscapes (obviously). There's "Close-Up" (the flower) for detailed pictures of small things, although I find this works best when you have a macro lens. The running person is usually when you're attempting to take a picture of your kid running the hundred meter dash. Lastly, there's "Night" mode (of the buildings) and "Night portrait" (person with a star near their head), both useful for the night on the town.

This is just a brief introduction to all the modes, although I will go into more detail soon, especially with the letter modes. If you're reading this to inform yourself more about what this dial does, then this should be enough for you to take in to mess around one day and just shoot.
It's all really simple, although it may seem like a lot, the repetitive reading and fooling around really helped me and will probably help you, too.

Adios, amigos!


Who needs introductions?

Hello again,
I just uploaded all the pictures I've taken so far on my computer, and I'm now going to give you a first taste of what I've been exploring.
So the first picture that I have that I thought was amazing, is of my cat.

I took this not really knowing what I was doing, just kind of fooling around. It was only when I hit the playback button (the button that you press
to view all of your photos) that I realized that I took a really crisp picture. I can't remember what I did to take this or get this precise effect, I probably just put it on AUTO mode.
All the words that are in red, by the way, are notes from me to you to tell you that later on in all of these posts I will talk about what it means in much more detail so that you can follow along and understand what I'm talking about. All of the stuff that I know is self-taught by reading forums, the manual (more than three times), or asking people on websites. The photography world out there is huge and thank goodness, otherwise I'd be lost.


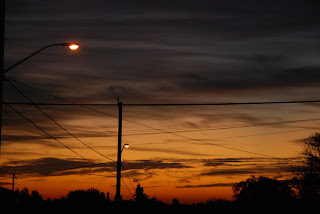
Back to the photos, I'm going to show you two more that are just me trying to figure out how it all works. The first from the top of a hill three blocks down my street. I set out the same day that I got the camera to take it right before it got dark and the picture turned out all right, but because I didn't have a tripod, I couldn't keep the camera from shaking while it tried to take in as much light as possible. The other is the next morning, I made a coffee (as I am slightly addicted) and thought that a picture of the smoke would be kind of cool.


So, as you can see, I've managed to just barely capture the steam from the cup, and the sunset is a little too dark for my liking. I will talk more about how I assume I could have possible changed that when I hopefully bring up aperture and shutter speed. But right now, I have to go to bed, so goodnight for now, hope to rant some more tomorrow.

Peace

Friday, November 11, 2011

Independent Study Unit

Hello,

For you stumbling upon this blog, this is specifically for school use only and my apologies in advance if my information is incorrect. On this blog, you will find everything about photography, the how's, the why's, when's, ect. Everything posted on here are my my own opinions, are gathered from either my own reading or personal discovery. If you find that anything on here doesn't quite make any sense to you, I will also always post a link to other sites that talk about the same things that are more accurate, and either go into it with more detail, or are easier to understand.
Now, you may ask why I would post other people's websites when I'm writing my own about the same thing? Well, for one, this blog is for my ISU (Independent Study Unit) and I chose to do it on photography, and I saw fit to write what I discovered and the how's in a blog for other people to see. This writing helps me 1) reinsure what I've learned and 2) helps me retain what I've learned by re-explaning to other people. I thought that it would be kind of stupid to write about photography and maybe get some of it wrong, then have the person who is reading just go and look for another site. Well lucky for them, I've included a bunch of other sites that will help them understand if what I'm typing doesn't make any sense.
Now, lastly, every post on here will be listed from most important to most detailed, and if I find that I wrote something that is inaccurate and see fit that I should write it again or add something else, I will add another post that indicates a changed older post.

Questions or comments are warmly welcomed, enjoy and go out and shoot!


A demains,
Sincerely Footphilosopher