All right, so last post I briefly mentioned the mode dial and the effects and slight benefits of
each mode. In this post, I will go into more detail with the "letter*" modes.
Starting with the "A," which stands for aperture, if you have your camera on
you or are just reading, you can switch your dial to the "A" and if you prefer, switch your focus to either manual (M) or autofocus (AF)*.
To further clarify how to switch your lens from Manual
focus to Autofocus (and vice versa), the picture on the right indicates where the switch is.
Now that you're set up, try to take a picture of something close-up. Go on!
What do you notice?
See how the background of the image isn't quite blurry? Or maybe it's very blurry and all the attention of the lens is focused on what you wanted to take a picture of? Well, let's say that your background was very sharp, but you wanted to soften everything so that there was more emphasis on the object of interest. What you want to do is look into your viewfinder.

Right near the middle of the line of numbers and letters at the bottom that appear in green,
there should be a letter "F" with a number besides it. Depending on what kind of lens you have, your aperture will change. Aperture is expressed as F-stop, e.g. F2.8 or f/2.8. The small
er the F-stop number (or f/value), the larger the lens opening (aperture). This means that with a smaller aperture (smaller opening) less light will come in and you will probably want to be taking pictures in open areas where there is a lot of light, while larger apertures (bigger openings) mean that your camera will take good pictures in low lighting. Therefore, if you are aiming to take a picture of something close-up, but are inside and there isn't much light, are larger aperture (ex. f/4.6) would be recommended. To change this setting, one must rotate the dial located on the front of the camera.
Here is a picture that I took in low lighting with an aperture of 5. Notice the clearness of the glass, while the background is still quite blurry.

If you're still curious about this and feel that I
haven't gone into enough detail about the subject, there is a link that I have posted that talks more about the same thing, hopefully it will help you.
Moving on! Next we have the "P" mode, which stands for Program. This mode I haven't yet
explored (haven't had a need to explore so far). I'm assuming that this mode is used mostly when you know what your subject will be and are not in the mood for setting everything up, so you've pre-programmed everything. If your camera came with a manual, then there should be more information in there, otherwise, I have posted another link about this and everything you need to know.
These last two are my favourite and I find myself using them quite a bit more than any other mode. Starting off with "S" for "Shutter," switch your dial to that. In this mode, as I have mentioned before, it is where you manually select the shutter speed that you feel has the best fit, while the camera automatically sets the aperture. Now, with the shutter speed, you can take many pictures with different lighting and with different effects depending on how you want certain moving objects to turn out.
I like this best for taking pictures in dark lighting and allowing to camera to gather the light, although it probably most commonly known when taking long exposure photos.
When setting this, you want to look for a number in your LCD display near the shutter button (the button that you click to take a picture).
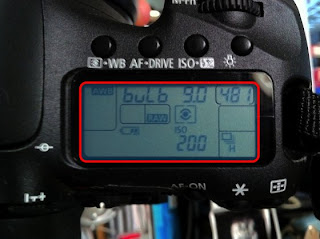
The number in this picture is not a number, actually, but a word. The word "bulb" in this
pictures is the replacing number that usually displays the shutter speed. with a faster shutter speed, less light can enter. Slower shutter speeds allow the lens to collect light.
When the camera is set to "bulb," you fully decide how long you keep the shutter open. With all of these modes and any mode, this can be tricky if you don't have a tripod and are looking to gather a lot of light in one shot.
In this other picture, you can see that the word is replaced by the number 100. This number means that the lens is opening and closing in one one hundredths of a second (1/100), which is considerably fast. (Also notice the aperture of f/5, below).
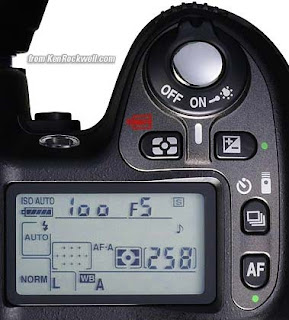
To change the shutter speed, one must switch a dial located underneath the LCD display. In the picture(below) it is circled as the "Adjustment Dial."

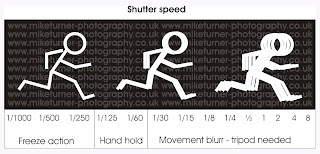
In this next picture, you'll notice that as the shutter speed gets smaller (1/1000 to 8 [eight seconds], the object gets very blurry as it is moving. With a shorter shutter speed on a moving object, the clearer the object will be, while the longer speed with only catch a blurry figure).
And lastly, there is "M" mode, a.k.a. manual mode. In this mode, you can decide what aperture and what shutter speed you want to achieve the photo you seek. I love this mode when I'm fooling around and what to see what I can produce with my camera. I think this is the most likeable mode because it leaves so much room for discovery and creativity. Although, if used falsely, the outcome may be horrendous. Play around with all of these modes, find what works with what lighting, or how long you should hold the button down to get the amount of light you desire.
So that just about summarizes and gives a brief description of the modes and what I learned from reading and trial and error. If there are any questions when you perhaps stumble across this blog, feel welcome to post and ask away.
Goodnight, for now.
*Anything highlighted in this shade of green means that you can find this word or a definition of this word somewhere else on this blog. If you are finding yourself to be confused about what I'm talking about and see that there is a word highlighted in green, I highly suggest going and finding the post where I elaborate on the topic.
No comments:
Post a Comment