Pages

Tuesday, November 15, 2011

Letters, eh?

All right, so last post I briefly mentioned the mode dial and the effects and slight benefits of
each mode. In this post, I will go into more detail with the "letter*" modes.
Starting with the "A," which stands for aperture, if you have your camera on
you or are just reading, you can switch your dial to the "A" and if you prefer, switch your focus to either manual (M) or autofocus (AF)*.
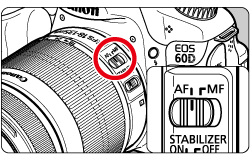

To further clarify how to switch your lens from Manual
focus to Autofocus (and vice versa), the picture on the right indicates where the switch is.
Now that you're set up, try to take a picture of something close-up. Go on!
What do you notice?
See how the background of the image isn't quite blurry? Or maybe it's very blurry and all the attention of the lens is focused on what you wanted to take a picture of? Well, let's say that your background was very sharp, but you wanted to soften everything so that there was more emphasis on the object of interest. What you want to do is look into your viewfinder.

Right near the middle of the line of numbers and letters at the bottom that appear in green,
there should be a letter "F" with a number besides it. Depending on what kind of lens you have, your aperture will change. Aperture is expressed as F-stop, e.g. F2.8 or f/2.8. The small
er the F-stop number (or f/value), the larger the lens opening (aperture). This means that with a smaller aperture (smaller opening) less light will come in and you will probably want to be taking pictures in open areas where there is a lot of light, while larger apertures (bigger openings) mean that your camera will take good pictures in low lighting. Therefore, if you are aiming to take a picture of something close-up, but are inside and there isn't much light, are larger aperture (ex. f/4.6) would be recommended. To change this setting, one must rotate the dial located on the front of the camera.

Here is a picture that I took in low lighting with an aperture of 5. Notice the clearness of the glass, while the background is still quite blurry.
If you're still curious about this and feel that I
haven't gone into enough detail about the subject, there is a link that I have posted that talks more about the same thing, hopefully it will help you.

Moving on! Next we have the "P" mode, which stands for Program. This mode I haven't yet
explored (haven't had a need to explore so far). I'm assuming that this mode is used mostly when you know what your subject will be and are not in the mood for setting everything up, so you've pre-programmed everything. If your camera came with a manual, then there should be more information in there, otherwise, I have posted another link about this and everything you need to know.

These last two are my favourite and I find myself using them quite a bit more than any other mode. Starting off with "S" for "Shutter," switch your dial to that. In this mode, as I have mentioned before, it is where you manually select the shutter speed that you feel has the best fit, while the camera automatically sets the aperture. Now, with the shutter speed, you can take many pictures with different lighting and with different effects depending on how you want certain moving objects to turn out.
I like this best for taking pictures in dark lighting and allowing to camera to gather the light, although it probably most commonly known when taking long exposure photos.
When setting this, you want to look for a number in your LCD display near the shutter button (the button that you click to take a picture).
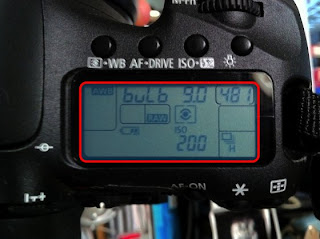
The number in this picture is not a number, actually, but a word. The word "bulb" in this
pictures is the replacing number that usually displays the shutter speed. with a faster shutter speed, less light can enter. Slower shutter speeds allow the lens to collect light.
When the camera is set to "bulb," you fully decide how long you keep the shutter open. With all of these modes and any mode, this can be tricky if you don't have a tripod and are looking to gather a lot of light in one shot.
In this other picture, you can see that the word is replaced by the number 100. This number means that the lens is opening and closing in one one hundredths of a second (1/100), which is considerably fast. (Also notice the aperture of f/5, below).
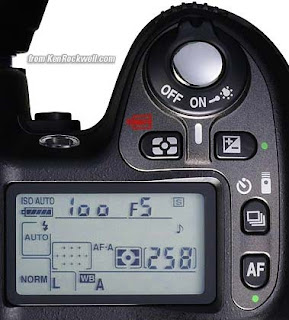
To change the shutter speed, one must switch a dial located underneath the LCD display. In the picture(below) it is circled as the "Adjustment Dial."


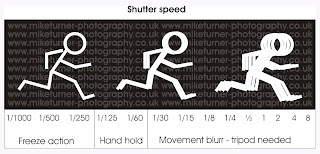
In this next picture, you'll notice that as the shutter speed gets smaller (1/1000 to 8 [eight seconds], the object gets very blurry as it is moving. With a shorter shutter speed on a moving object, the clearer the object will be, while the longer speed with only catch a blurry figure).


And lastly, there is "M" mode, a.k.a. manual mode. In this mode, you can decide what aperture and what shutter speed you want to achieve the photo you seek. I love this mode when I'm fooling around and what to see what I can produce with my camera. I think this is the most likeable mode because it leaves so much room for discovery and creativity. Although, if used falsely, the outcome may be horrendous. Play around with all of these modes, find what works with what lighting, or how long you should hold the button down to get the amount of light you desire.

So that just about summarizes and gives a brief description of the modes and what I learned from reading and trial and error. If there are any questions when you perhaps stumble across this blog, feel welcome to post and ask away.
Goodnight, for now.
*Anything highlighted in this shade of green means that you can find this word or a definition of this word somewhere else on this blog. If you are finding yourself to be confused about what I'm talking about and see that there is a word highlighted in green, I highly suggest going and finding the post where I elaborate on the topic.

Sunday, November 13, 2011

Mode, oh Mode...

Hello!


I said that I was going to go to bed, but I love typing and I really wanted to get this information down. In this post I'm going to really simply inform you of the different modes that are available with my camera. This won't be all that descriptive, just to get you started.
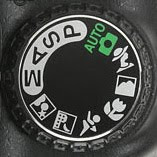
In this picture below, you will see that there are two areas that are separated by a silver lining around four of the modes (the ones that are just letters vs. the ones that just pictures).

I'll start with the letters, starting with the "M" and go clockwise.

The Letters...

The "M" stands for "Manual" mode, which is where everything you do to take your picture is manual (aperture, shutter speed, ISO, ect...).
The "A" stands for "Aperture" where you manually set the aperture, and the shutter speed is automatic.
The "S" is for "Shutter" where you manually set the shutter speed, while the aperture is automatic.
The "P" is for "Program." This you set manually and all the settings are preset.

Then there were the pictures...

"AUTO" is obviously the mode where the camera does everything for you where it sees the best fit. I love this mode especially when I don't want to miss an opportunity and can't figure out what settings I want fast enough.
Then there's "Portrait" (with the lady wearing a hat) for pictures of people, mostly, "Landscape" (with the mountains) for landscapes (obviously). There's "Close-Up" (the flower) for detailed pictures of small things, although I find this works best when you have a macro lens. The running person is usually when you're attempting to take a picture of your kid running the hundred meter dash. Lastly, there's "Night" mode (of the buildings) and "Night portrait" (person with a star near their head), both useful for the night on the town.

This is just a brief introduction to all the modes, although I will go into more detail soon, especially with the letter modes. If you're reading this to inform yourself more about what this dial does, then this should be enough for you to take in to mess around one day and just shoot.
It's all really simple, although it may seem like a lot, the repetitive reading and fooling around really helped me and will probably help you, too.

Adios, amigos!


Who needs introductions?

Hello again,
I just uploaded all the pictures I've taken so far on my computer, and I'm now going to give you a first taste of what I've been exploring.
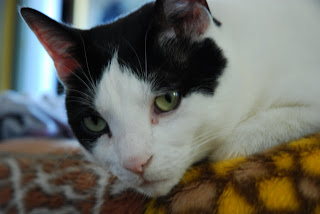
So the first picture that I have that I thought was amazing, is of my cat.

I took this not really knowing what I was doing, just kind of fooling around. It was only when I hit the playback button (the button that you press
to view all of your photos) that I realized that I took a really crisp picture. I can't remember what I did to take this or get this precise effect, I probably just put it on AUTO mode.
All the words that are in red, by the way, are notes from me to you to tell you that later on in all of these posts I will talk about what it means in much more detail so that you can follow along and understand what I'm talking about. All of the stuff that I know is self-taught by reading forums, the manual (more than three times), or asking people on websites. The photography world out there is huge and thank goodness, otherwise I'd be lost.


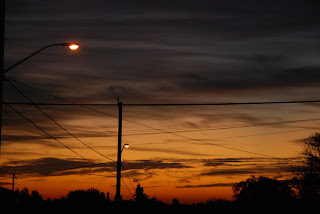
Back to the photos, I'm going to show you two more that are just me trying to figure out how it all works. The first from the top of a hill three blocks down my street. I set out the same day that I got the camera to take it right before it got dark and the picture turned out all right, but because I didn't have a tripod, I couldn't keep the camera from shaking while it tried to take in as much light as possible. The other is the next morning, I made a coffee (as I am slightly addicted) and thought that a picture of the smoke would be kind of cool.


So, as you can see, I've managed to just barely capture the steam from the cup, and the sunset is a little too dark for my liking. I will talk more about how I assume I could have possible changed that when I hopefully bring up aperture and shutter speed. But right now, I have to go to bed, so goodnight for now, hope to rant some more tomorrow.

Peace

Friday, November 11, 2011

Independent Study Unit

Hello,

For you stumbling upon this blog, this is specifically for school use only and my apologies in advance if my information is incorrect. On this blog, you will find everything about photography, the how's, the why's, when's, ect. Everything posted on here are my my own opinions, are gathered from either my own reading or personal discovery. If you find that anything on here doesn't quite make any sense to you, I will also always post a link to other sites that talk about the same things that are more accurate, and either go into it with more detail, or are easier to understand.
Now, you may ask why I would post other people's websites when I'm writing my own about the same thing? Well, for one, this blog is for my ISU (Independent Study Unit) and I chose to do it on photography, and I saw fit to write what I discovered and the how's in a blog for other people to see. This writing helps me 1) reinsure what I've learned and 2) helps me retain what I've learned by re-explaning to other people. I thought that it would be kind of stupid to write about photography and maybe get some of it wrong, then have the person who is reading just go and look for another site. Well lucky for them, I've included a bunch of other sites that will help them understand if what I'm typing doesn't make any sense.
Now, lastly, every post on here will be listed from most important to most detailed, and if I find that I wrote something that is inaccurate and see fit that I should write it again or add something else, I will add another post that indicates a changed older post.

Questions or comments are warmly welcomed, enjoy and go out and shoot!


A demains,
Sincerely Footphilosopher